You recently got your guitar and started practicing twenty-four hours, seven days a week and at some point, from all the exercise, strings either got too dirty or dull or maybe one of them broke. Now you have to restring and doing it for the first time might seem like a hassle and a bit too arduous but if you know the basics and follow the instruction there is not too much space for a mistake. So let’s get started.
Learning how to restring an acoustic guitar is an essential skill every guitarist should master. Whether you’re a beginner picking up your first acoustic guitar or an experienced player, proper string changing technique will save you time, money, and potential damage to your instrument.
This comprehensive guide will walk you through the entire process, from determining when to change strings to professional techniques that ensure optimal sound quality and tuning stability.
When to Change Your Acoustic Guitar Strings
Signs It’s Time for New Strings
Many guitarists struggle with knowing when to replace their strings. Here are the key indicators that it’s time for a fresh set:
Visual Signs:
- Visible grime, dirt, or oxidation on the strings
- Dark spots or discoloration on wound strings
- Fraying or unwinding of the outer wrap wire
- Dents or flat spots over frequently played frets
Sound Quality Changes:
- Dull, lifeless tone compared to when strings were new
- Difficulty staying in tune
- Reduced sustain and volume
- Loss of brightness and clarity
Physical Feel:
- Rough texture when sliding along the strings
- Sticky or grimy feeling under your fingertips
- Strings that feel “dead” when played
How Often Should You Change Strings?
String replacement frequency varies significantly based on several factors:
Playing Style and Frequency:
- Heavy players: Every 1-2 weeks
- Regular players: Every 2-4 weeks
- Casual players: Every 1-3 months
- Occasional players: Every 3-6 months
Environmental Factors:
- High humidity: Strings may last longer but can sound dull
- Low humidity: Strings may break more easily
- Temperature fluctuations: Can affect string life and tuning stability
Personal Chemistry: Some players have acidic sweat that can corrode strings within hours, while others can use the same set for months. Pay attention to how your body chemistry affects your guitar strings.
Essential Tools and Materials
Before you begin restringing your acoustic guitar, gather these items:
Required Tools:
- String winder (manual or electric)
- Wire cutters or string snips
- Needle-nose pliers (for stubborn bridge pins)
- Soft cloth for cleaning
Optional but Helpful:
- String stretcher for faster settling
- Fretboard conditioner for cleaning while strings are off
- Guitar tuner for accurate tuning
- Masking tape (for marking bridge positions on archtops)
Choosing the Right Strings:
Consider your playing style and tonal preferences when selecting strings. Light gauge strings are easier to play but may lack volume, while heavier gauges provide more power and sustain.
Common Restringing Mistakes to Avoid
Losing Small Parts
Many guitar components are held in place solely by string tension:
- Bridge pins can fall out when strings are removed
- Saddle may shift or fall out completely
- Nut can become loose on older instruments
- Tuner bushings may slip out of position
Pro Tip: Always work on a clean, flat surface and keep a small container nearby for loose parts.
Incorrect Ball End Placement
Bridge Pin Guitars: The ball end must seat properly against the bridge plate (underside of the top). If it dangles below, it will create annoying buzzes and rattles.
Proper Installation:
- Insert the string ball into the hole
- Place the bridge pin loosely
- Pull up gently on the string until you feel resistance
- Press the pin firmly into place
Over-Winding or Under-Winding
Too Many Wraps: Causes tuning instability and string overlap Too Few Wraps: Leads to slipping and poor tuning retention
Ideal Wrap Count:
- Heavy strings (low E, A, D): 2-3 wraps
- Light strings (G, B, high E): 3-5 wraps
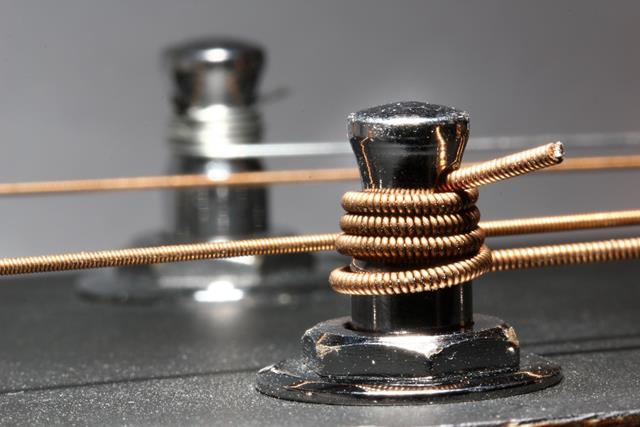
The Professional Z-Bend Technique
This method, developed by professional luthiers, is the most reliable way to secure strings while ensuring easy removal later.
Step-by-Step Process
Step 1: Prepare Your Workspace
- Work on a clean, flat surface
- Have all tools within reach
- Remove old strings one at a time (unless doing fretboard maintenance)
Step 2: Install Bridge End First
For each string:
- Insert the ball end into the appropriate bridge hole
- Install the bridge pin loosely
- Pull the string until the ball seats against the bridge plate
- Press the pin firmly into place
Step 3: Thread Through Tuning Post
- Pull the string up to the corresponding tuning peg
- Insert through the hole in the tuning post
- Leave approximately 2-3 inches of slack (enough for 4 fingers between string and fretboard)
Step 4: Create the Z-Bend
This is the crucial step that ensures secure, slip-free winding:
- Bend both sides simultaneously: Create a Z-shape by bending the string on both sides of the tuning post
- Direction matters:
- Bass strings (E, A, D): Bend clockwise
- Treble strings (G, B, E): Bend counter-clockwise
- Clip excess: Cut the trailing end, leaving about 1/4 inch
Step 5: Wind the String
- Wind direction: Always wind so new wraps go below previous ones
- Maintain tension: Keep slight tension on the string while winding
- Watch the wraps: Ensure they stack neatly without overlapping
- Stop at pitch: Don’t over-tighten initially
Why the Z-Bend Works
The Z-bend technique creates opposing pressure on both sides of the tuning post hole, creating a mechanical lock that prevents slipping even under extreme tension. This method:
- Holds securely without complicated knots or threading
- Removes easily without tools or breaking
- Works with all string gauges from ultra-light to heavy
- Saves time compared to traditional wrapping methods
Tuning and Stretching New Strings
Initial Tuning Process
- Tune to pitch gradually: Bring each string up slowly to avoid breaking
- Go slightly flat initially: New strings will stretch and go sharp
- Work in cycles: Tune all strings, then repeat 2-3 times
Stretching Techniques
Manual Stretching:
- Gently pull each string away from the fretboard
- Start at the 12th fret and work toward the nut
- Use moderate pressure – don’t overstretch
Playing Method:
- Play through your regular repertoire
- Focus on bends and vibrato
- Re-tune frequently during the first hour
Settling Time
New strings typically take 24-48 hours to fully settle. During this period:
- Expect frequent re-tuning
- Avoid extreme bending or heavy playing
- Check tuning before each practice session
Special Considerations
12-String Guitars
Octave String Placement: The high G octave string must be wound from top to bottom around the tuning post to prevent the hole from cutting the string.
Tuning Order: Always tune the main strings first, then adjust the octave strings to match.
Archtop Guitars
Bridge Positioning: The bridge is held only by string tension. Mark its position with de-tacked masking tape before removing strings.
Floating Bridge Setup: When replacing all strings, install them in sequence to maintain bridge position.
Classical Guitars
Nylon String Handling: Nylon strings require different techniques:
- Tie off at the bridge rather than using pins
- Allow extra settling time
- Be patient with initial tuning instability
Maintenance Tips for Longer String Life
Before Playing
- Wash your hands to remove oils and dirt
- Wipe down strings with a clean cloth after playing
- Store properly in a case or with humidity control
Regular Maintenance
- Clean strings weekly with appropriate string cleaner
- Check tuning pegs for smooth operation
- Inspect bridge pins for wear or damage
- Condition the fretboard during string changes
Environmental Care
- Maintain proper humidity (45-55% relative humidity)
- Avoid extreme temperatures
- Use a guitar humidifier in dry conditions
- Store in a quality guitar case
Troubleshooting Common Issues
String Breakage During Installation
Causes:
- Sharp edges on nut or saddle
- Over-tuning too quickly
- Defective strings
- Worn bridge pins
Solutions:
- Tune gradually and gently
- Inspect hardware for sharp edges
- Consider professional setup if breakage continues
Tuning Instability
Possible Causes:
- Improper winding technique
- New strings not stretched properly
- Hardware issues (worn tuners, improper nut slots)
- Environmental factors
Solutions:
- Ensure proper Z-bend installation
- Allow adequate stretching time
- Check tuning peg operation
- Consider professional adjustment
String Buzzing After Restringing
Common Causes:
- Bridge pin not seated properly
- Saddle displaced during restringing
- String touching frets due to low action
- Nut slots cut too deep
Quick Fixes:
- Re-seat bridge pins properly
- Check saddle position
- Verify proper string installation
- Consult a guitar technician for setup issues
When to Seek Professional Help
While restringing is a skill every guitarist should learn, some situations require professional attention:
Setup Issues
- Persistent tuning problems after proper restringing
- String buzzing or fretting out
- High action that makes playing difficult
- Intonation problems
Hardware Problems
- Worn or damaged tuning pegs
- Cracked or worn nut
- Bridge pin holes that don’t hold pins securely
- Saddle that doesn’t fit properly
Valuable Instruments
For vintage or high-value guitars, consider having the first restringing done professionally to ensure proper technique and identify any potential issues.
Conclusion
Mastering the art of restringing your acoustic guitar empowers you to maintain your instrument properly and ensures optimal sound quality. The Z-bend technique outlined in this guide provides a professional-level approach that’s both secure and practical.
Remember that practice makes perfect – your first few string changes may take longer, but with experience, you’ll be able to restring your guitar quickly and confidently. Regular string changes not only improve your sound but also give you valuable opportunities to inspect your instrument and catch potential issues early.
Whether you’re playing a beginner acoustic guitar or a professional instrument, proper string maintenance is crucial for optimal performance. Take your time, follow these techniques, and enjoy the bright, responsive sound of fresh strings.
For more guitar maintenance tips and equipment reviews, explore our comprehensive guides on guitar accessories and acoustic guitar care.
Related Articles:
- Best Acoustic Guitar Strings for Every Playing Style
- Best Electric Guitar Strings
- Essential Guitar Maintenance Tools
")
")
")

